Qubes Networking Intro
From the networking point of view there are three types of VMs in Qubes:
- Net VMs, that have networking devices assigned to them, such as e.g. a WiFi or Ethernet card. Each Net VM contains a Xen network backend that is used to provide networking to all VMs that are connected to this Net VM.
- Regular VMs (AppVMs) that use the networking provided by Net VMs (so they have Xen network frontends that provide virtual interfaces that are backed by the backend in the corresponding Net VM.
- Proxy VMs that combine both of the above: to Net VMs they look like regular AppVMs, because they are consumers of the networking they provide, but to other AppVMs they act as if they were Net VMs themselves, allowing other VMs to connect to them. Of course the Proxy VMs do not have directly assigned networking devices – they use the networking provided by the Net VM that they connect to. One can chain many Proxy VMs, as we will see below.
The virtual interfaces in client VMs are called ethX, and are provided by the xen_netfront kernel module, and the corresponding interfaces in the Net/Proxy VM are called vifX.Y and are created by the xen_netback module.
Each Net and Proxy VM implements NAT, specifically masquerading, for all the connected VMs. Additionally to this SNAT, each Net or Proxy VM provides also DNAT redirection for DNS resolutions, so that each VM behind a Proxy or Net VM thinks that it uses a DNS in the Net/Proxy VM, but in fact all the DNS request are DNAT-ed by all the Proxy and Net VMs down the original DNS that is provided to the final Net VM. This smart trick allows us to avoid running a DNS caching server in Proxy/Net VMs.
Also, any VM-to-VM traffic, among the VMs connected to the same Net/Proxy VM is blocked by default.
Additionally, each Proxy VM enforces system-wide firewaling rules, specifically the rules for all the directly connected VMs. Those firewalling rules are centrally managed in Dom0 and exposed to each Proxy VM through Xen store. One useful application of this firewalling mechanism is to limit certain VMs to only specific type of white-listed traffic to minimize likelihood of user mistakes. A good example could be a work VM that might be limited to network connectivity only with the select corporate servers and denied all other traffic. This way, when the user receives an email message with an embedded http link (possibly leading to a malicious website) and accidentally clicks on it, nothing wrong happens.
The current infrastructure doesn't support IPv6 routing, but we will likely add this support in the upcoming Beta 3.
The default networking topology in Qubes OS
When you proceed with the default installation of Qubes Beta 2, then your initial networking topology looks like on the diagram below:
When you proceed with the default installation of Qubes Beta 2, then your initial networking topology looks like on the diagram below:
 |
| The default network configuration in Qubes. |
So, by default there is one Net VM, called 'netvm', that is automatically assigned all the networking devices in the system. There is also one Proxy VM, called 'firewallvm' that is directly connected to the default Net VM, and which provides networking to all other VMs in the system. This Proxy VM is used for firewall rules enforcement. Each such service VM consumes 200MB of RAM by default.
Network-isolated VMs
For some VMs it might be desirable to completely disconnect them from any kind of networking access. This can be easy done using the following command (issued from Dom0's konsole):
[dom0]$ qvm-prefs -s
For example I have a 'vault' VM that I use for keeping my master PGP keys, and other secrets, and this machine is not connected to any network.
Using multiple Net VMs for physically isolated networks
In some scenarios the machine might be connected to two or more physically separate networks (e.g. safe corporate intranet, reachable via ethernet cable on the user's desk, and the unsafe and evil Internet, reachable via WiFi card).
It is easy to use more than one Net VMs in Qubes, and assign different networking devices to different Net VMs, and also decide which VMs are connected to which Net VMs. The diagram below presents an exemplary such setup:
 |
| A simple setup with two isolated networks, and one fully isolated domain ('vault'). |
We could created such a setup using the following commands (issued in Dom0):
[dom0]$ qvm-create netvm1 --net --label red
[dom0]$ qvm-create netvm2 --net --label yellow
Currently qvm-create when used with the --net option automatically assigns all networking devices to the just created VM, so in the example above you would want to remove extra devices from each Net VM using qvm-pci -d, leaving only those you really want, e.g.:
[dom0]$ qvm-pci -l netvm1 # to get a list of currently assigned devices
[dom0]$ qvm-pci -l netvm1 # to get a list of currently assigned devices
[dom0]$ qvm-pci -d netvm1 02:00.0
Now we should create the Firewall VMs:
[dom0]$ qvm-create firewallvm1 --proxy --label green
[dom0]$ qvm-create firewallvm2 --proxy --label green
... and connect them to proper Net VMs:
[dom0]$ qvm-prefs -s firewallvm1 netvm netvm1
[dom0]$ qvm-prefs -s firewallvm2 netvm netvm2
And now, for any other VM, just set the appropriate Net VM (either firewallvm1 or firewallvm2, or 'none), to get it assigned to either of the isolated networks, e.g.:
[dom0]$ qvm-prefs -s banking netvm firewallvm1
[dom0]$ qvm-prefs -s xfiles netvm firewallvm2
[dom0]$ qvm-prefs -s vault netvm none
...
This configuration provides very strong isolation between the VMs belonging to network #1, and the VMs belonging to network #2. Specifically, this becomes significant if we fear about potential remotely exploitable bugs in the client code of the core TCP/IP stack (in this case the Net VM could potentially compromise all the connected VMs -- but the same problem applies to even physically separated machines that use the same network).
Setting up Tor Proxy using a Proxy VM
Let's now play a bit with Proxy VMs and see how we can use it to create a simple Tor proxy VM. Such a VM would provide anonymized networking to all its clients, so would allow to easily create VMs for anonymous Internet access. The simple setup we would like to prepare is depicted on the figure below:
 |
| The 'torvm' Proxy VM provides anonymized networking to 'anon-web' and 'anon-bitcoin' VMs. All the traffic generated by the VMs behind 'torvm' is either fed into the Tor network, or discarded. Furthermore, any app running in those VMs is not able to read any global system identifiers, such as the external IP, external MAC address, etc. |
Our Tor proxy would forward only the Tor traffic, so we don't have to
fear about some Tor-not-aware applications, or even intentionally
malicious ones to compromise the privacy of our connection. This is
because such applications have no way to generate traffic to the
outside world without going through our Tor proxy (unless they could
exploit a hypothetical vulnerability in the Tor process running in
the Tor VM). Also, the applications running in any VM behind the Tor
proxy are not able to determine any globally identifiable IDs, such
as the user's external IP address, the real MAC address used by real
NICs, etc.
Interestingly just after writing the above paragraph, I discovered
that one of our xenstore keys had wrong permissions and, as a result,
any VM could read it and get to know the actual external IP (the key
is used by a Net VM to communicate the external IP configuration to
the connected Proxy VMs, so they could know when to update the
firewall configuration). The fix for this problem is here,
and the update (qubes-core-dom0-1.6.32) is now available for Dom0
(just do qvm-dom0-update
to get it installed).
So, this represents a rather strong setup for use with Tor. Let's now
have a look at how to practically create such a configuration, step
by step.
First, let's create the VM that will become our Tor proxy:
[dom0]$
qvm-create torvm --proxy --label green
This will create a Proxy VM named 'torvm', based on the default
template. We will need to now start the template VM and install the
Tor client there:
[dom0]$ qvm-run
-a fedora-14-x64 gnome-terminal
Alternatively, if we didn't trust the Tor client rpm package to be
non-malicious, specifically for its installation scripts to be non
malicious, we could have based this on a different template, e.g. one
used for less trusted VMs, or we could installed the Tor client in
/usr/local,
that is backed by the VM's private storage, but this would require
compiling Tor from sources.
Now, in the just started template VM,
lets install the Tor client and (optionally) the Vidalia graphical
frontend:
[fedora-14-x64]$
sudo yum install tor vidalia
And then power off
the template VM. Now, every VM based on this template, started after
the template shutdown, will also see the Tor binary in its
filesystem.
Let's now configure
our torvm to properly start Tor proxying at boot:
[dom0]$ qvm-run
-a torvm gnome-terminal
Now, we will create
the following script for starting up the Tor transparent proxy and
setting up traffic redirection using iptables:
[torvm]$ vim
/rw/config/start_tor_proxy.sh
...and now paste the
following into this file:
#!/bin/shkillall torQUBES_IP=$(xenstore-read qubes_ip)TOR_TRANS_PORT=9040if [ X$QUBES_IP == X ]; thenecho "Error getting QUBES IP!"echo "Not starting Tor, but setting the traffic redirection anyway to prevent leaks."QUBES_IP="127.0.0.1"else/usr/bin/tor \--SocksPort 0 \--TransListenAddress $QUBES_IP --TransPort $TOR_TRANS_PORT \--DNSListenAddress $QUBES_IP --DNSPort 53 \--RunAsDaemon 1 --ControlPort 9051 \|| echo "Error starting Tor!"fiecho “0” > /proc/sys/net/ipv4/ip_forward/sbin/iptables -t nat -F/sbin/iptables -t nat -A PREROUTING -i vif+ -p udp --dport 53 -j DNAT --to-destination $QUBES_IP:53/sbin/iptables -t nat -A PREROUTING -i vif+ -p tcp -j DNAT --to-destination $QUBES_IP:$TOR_TRANS_PORT/sbin/iptables -I INPUT 1 -i vif+ -p udp --dport 53 -j ACCEPT/sbin/iptables -I INPUT 2 -i vif+ -p tcp --dport 9040 -j ACCEPT/sbin/iptables -F FORWARD
echo “1” > /proc/sys/net/ipv4/ip_forward
Except for the
“QUBES_IP=$(xenstore-read
qubes_ip)” line that reads the torvm's
IP address, there is nothing Qubes-specific in the above listing.
It's just a standard way of setting up transparent Tor proxy.
It is important
that this file be located in the /rw
directory, as this directory is backed by the VM's private storage
and will survive VM reboots. The VM's root file-system is read-only
and all the changes to it are lost on VM shutdown (VM gets an
illusion of the root fs being writeable thanks to Copy-On-Write
mechanism, but the actual COW backing device is cleared upon each VM
shutdown).
We should also
modify the /rw/config/rc.local
script, to ensure that our Tor proxy is automatically started -- just
paste the following into this script:
#!/bin/sh# Uncomment this if you would like to use a custom torrc file:#rm -f /rw/config/log#ln -sf /rw/config/torrc /etc/tor/torrcchkconfig qubes_netwatcher offchkconfig qubes_firewall off/rw/config/start_tor_proxy.sh
Finally we should
also provide a script that would restart our proxy in case the user
dynamically switched the NetVM, which would result in the completely
different routing. This could be done by creating a script with
predefined name qubes_ip_change_hook
within /rw/config/
directory:
#!/bin/sh/rw/config/start_tor_proxy.sh
Make sure that all the scripts are executable (chmod +x). And that's all.
Now, shutdown the torvm:
[dom0]$ qvm-run
--shutdown --wait torvm
From now on, every
time you start the torvm (or when Qubes starts it in response to
start of some other VM that uses torvm as its Net VM), the Tor
transparent proxy should be automatically started.
Let's test this by
creating a VM that would be using the just created Tor proxy:
[dom0]$
qvm-create anon-web --label black
[dom0]$
qvm-prefs -s anon-web netvm torvm
Now, every time you
start the anon-web VM (e.g. by clicking on the Web browser icon in
the anon-web's start menu), Qubes will also ensure that torvm is up
and running, and this in turn would configure all the Tor proxying
for this VM.
Fo additional
control one might want to use Vidalia, the graphical front end for
Tor (this should be installed within the template VM that has been
used for torvm). We could easily start Vidalia by just typing:
[dom0]$ qvm-run
-a torvm vidalia
We should however
make sure to disable "Start the Tor software when vidalia
starts" option in Settings/General in Vidalia. Otherwise,
Vidalia might kill your original Tor (that has transparent proxy
open) and start own without transparent proxy enabled.
 |
| The web browser runs in the 'anon-web' VM that uses 'torvm' for networking access, and thus all the traffic generated by 'anon-web' is routed through the Tor network, or discarded if it's a different traffic than TCP or DNS. |
Of course one case easily create more VMs that would be using torvm
as their Net VM, as so would have anonymized network access. The
beauty of this solution is that in case one of my anonymized VM gets
compromised, others do not. Plus, the already mentioned benefit, that
no matter whether apps in those VMs are buggy, or even intentionally
malicious, they would not be able to leak out the user's external IP
address.
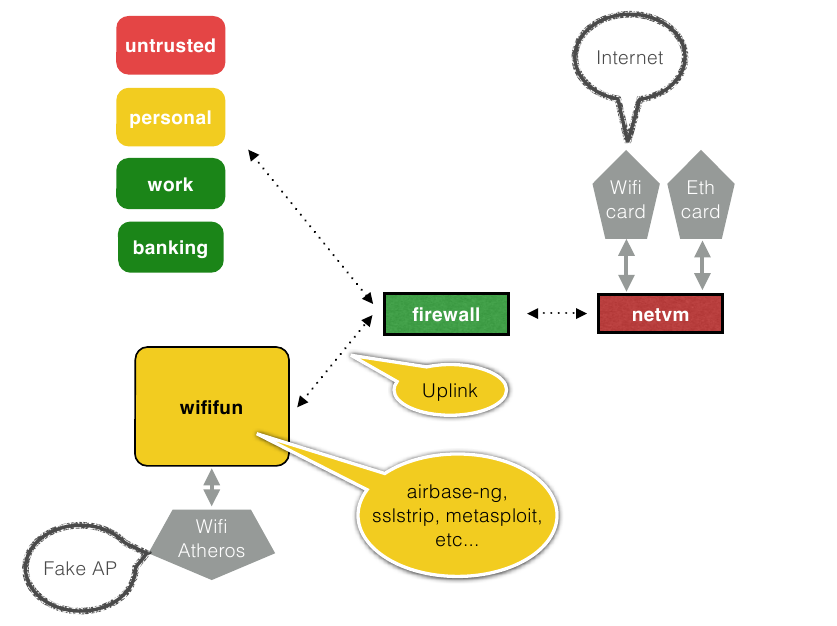
Creating a WiFi
pen-testing VM
Finally let's have some fun and create a WiFi pen-testing VM. The
desired config is depicted below:
Because we would like to use all sorts of l33t h4x0r t00lz
pen-testing security software in this VM, it would make sense to
create it as a Standalone
VM, which means that
it would get its own copy of the whole file-system (as opposed to
just the home directory, /rw
and /usr/local,
as it is the case with regular Qubes VMs). This would ease the
installation of all the extra software we would need there, and also
ensure that even if the install/build scripts were malicious, the
damages would be contained only to this very VM and nothing else.
Also, for some reason the standard Linux WiFi stack and drivers still
don't support injection on (all?) most of the WiFi cards out of the
box, so we would need to patch the actual kernel drivers -- yet
another reason to use a Standalone VM in this case.
So, let's create the VM first, and assign a WiFi card to it:
[dom0]$
qvm-create wififun --standalone --label yellow
[dom0]$
qvm-prefs -s wififun memory 800 #
ensure at least this mem at startup
[dom0]$
qvm-prefs -s wififun kernel none #
use own copy of kernel and modules
[dom0]$ qvm-pci
-a wififun
You
can easily find the BDF address of any device using the lspci
command in Dom0 -- this would be something like e.g. “02:00.0”.
You should make sure that this WiFi card is not used by any other VM,
specifically by your default Net VM (called 'netvm' in a standard
Qubes installation). Ideally you could just use a dedicated Express
Card-based WiFi card, leaving the built in WiFi assigned to your
default Net VM.
Because it's a
Standalone VM, Qubes will make a copy of the whole root filesystem,
and thus it would eat about 5GB of your disk (normal VMs would take
only as much space as their private fs takes up).
Let's now start the VM...
[dom0]$ qvm-run
-a wififun gnome-terminal
... and then install the prerequisite software there, starting with
downloading the reasonably new compat-wireless sources, together with
the required injection patches, and then building and installing the
new kernel modules. All actions below are now executed within the VM.
This stuff here is really nothing Qubes- or Xen-specific -- one would
do more or less the same on any Linux in order to get injection
working (so, treat this as a free bonus WiFi hacking tutorial on
Linux).
[wififun]$ wget
http://linuxwireless.org/download/compat-wireless-2.6/compat-wireless-2011-07-14.tar.bz2
[wififun]$ wget
http://patches.aircrack-ng.org/channel-negative-one-maxim.patch
[wififun]$
wget
http://patches.aircrack-ng.org/mac80211-2.6.29-fix-tx-ctl-no-ack-retry-count.patch
[wififun]$
wget
http://patches.aircrack-ng.org/mac80211.compat08082009.wl_frag+ack_v1.patch
[wififun]$ sudo
yum install kernel-devel patch gcc
[wififun]$ tar
xjf compat-wireless-2011-07-14.tar.bz2
[wififun]$ cd
compat-wireless-2011-07-14
[wififun]$
patch -p1 < ../channel-negative-one-maxim.patch
[wififun]$
patch -p1 < ../mac80211-2.6.29-fix-tx-ctl-no-ack-retry-count.patch
[wififun]$
patch -p1 < ../mac80211.compat08082009.wl_frag+ack_v1.patch
[wififun]$ make
[wififun]$ sudo
make unload
[wififun]$ sudo
make install
Now, lets reboot the VM to ensure that
all the patched drivers will get properly loaded on each VM boot:
[dom0]$ qvm-run
--shutdown --wait wififun
[dom0]$ qvm-run
-a wififun gnome-terminal
Let's first see if the WiFi driver got properly loaded and if the
interface has been created (look for wlanX
interface):
[wififun]$
ifconfig -a
If yes, then proceed with the steps below (if not, then have a look
into dmesg and see what was the problem):
[wififun]$ sudo
bash
[wififun]# yum
install aircrack-ng dnsmasq
[wififun]#
airmon-ng start wlan0
[wififun]#
iptables -F INPUT
[wififun]#
iptables -F FORWARD
[wififun]# echo
“1” > /proc/sys/net/ipv4/ip_forward
Note that you don't need to add any
explicit masquerading rules, as they are applied by default on Qubes
VMs (you can take a look at the nat table in the VM if you
want to see by yourself).
Edit the /etc/dnsmasq.conf,
so that it contains at least the following:
interface=at0
dhcp-range=192.168.0.50,192.168.0.150,12h
and then start the dnsmasq daemon -- we
will use it for providing DHCP to our fake AP (the at0 interface will
be created by airbase-ng and emulates the “uplink” of a
traditional AP):
[wififun]#
/etc/init.d/dnsmasq start
And finally the fake AP:
[wififun]#
airbase-ng -e free_wifi mon0
and on another console (before any
client connects, but after airbase-ng
got started), configure the at0
interface (make sure it matches what you wrote into dnsmasq.conf):
[wififun]#
ifconfig at0 192.168.0.1 up
(you can also add an udev rule to that
automatically).
and just to verify it really is
working:
[wififun]#
tcpdump -i at0
... and now, just wait for a client to
connect to your AP. What you do next is only limited by your
imagination... But hey, this article is about Qubes networking and
not about 0wning client systems ;)
Here's an innocent example using
Moxie's sslstrip (amazing this attack still works so well at the end
of 2011...):
 |
| My 'wififun' VM in action using a simple sslstrip attack, that surprisingly still works pretty nice... |
Please note that as your wififun VM is a regular Qubes VM, it is
automatically connected to the default Net VM, which in turn provides
networking to it. That's why it is so easy to create a fully
functioning fake AP.
When using custom driver domains, there are currently some catches
you should be aware:
Catch #1: When
you start a driver domain late
after system boot, so after some days of uptime and extensive use of
VMs, Xen might not be able to allocate enough continues (in terms of
MFNs) memory for a driver domain. And PV driver domains, unlike
normal domains or HVM driver domains, do require MFN-continuous
memory for their DMA buffers (HVM domains do not need that, because
IOMMU can create an illusion of this; even though IOMMU is also used
for PV driver domains, for protection, it doesn't actively translate
bus addresses into GMFNs).
This is usually not a big
problem in practice, because in most cases all the driver domains are
started early at system boot, when there is still plenty of
non-fragmented memory available. However it might become a problem
when one wishes to start e.g. the WiFi pen-testing at some later
time. The work around is to close as many VMs as possible before
starting such driver domain, and then also reducing, for a moment,
the amount of memory assigned to Dom0:
[dom0]$
xm mem-set 0 1600m
and
then starting the driver domain should be fine. Now we can start all
other domains, and that should no longer be problematic for the
already running driver domain.
Catch #2: Some
network cards, notably Express Cards, might not work well with the
3.0.4 pvops kernel that we use in all VMs by default. In that case
you might want to try to use the 2.6.38.3 xenlinux kernel in your
WiFi fun VM -- to do that, follow these steps:
[dom0]$
sudo qvm-dom0-update kernel-qubes-vm-2.6.38.3-10.xenlinux.qubes
[dom0]$
cp /var/lib/qubes/vm-kernels/2.6.38.3/*
/var/lib/qubes/appvms/wififun/kernels/
[dom0]$
qvm-prefs wififun -s kernelopts "swiotlb=force"
And then, in the VM:
[wififun]$ sudo
yum install kernel-devel-2.6.38.3-10.xenlinux.qubes
And rebuild the compat-wireless,
unload, install modules, and then load drivers again.
Summary
As you can see, Qubes Beta 2 now offers a very advanced networking
infrastructure that allows more advanced users to create very
sophisticated configurations, allowing for pretty good isolation
between various domains and networks. Qubes leaves it up to the user
(or admin) to figure out what would be the best configuration -- most
users would be happy with the default simple setup with just one Net
VM and one Firewall VM, while others would go for much more advanced
setups.
 |
| A bit more advanced networking setup. The usbvm has a 3G modem assigned, and it is possible to dynamically switch between the Net VMs without restarting any other VMs. |

10 comments:
I'm impressed by how easy it looks!
More of a Tor question but can 1 physical PC run multiple concurrent secure channels?
e.g. So that I can have one VM + tor channel for hacking the Pentagon and a different pair for posting to my anonymous blog.
Presumably in your setup this would require multiple tor VMs?
Also, does Qubes work in a multi user fashion i.e. on my home PC for myself + kids?
I know that's not the usage scenario you expect :-)
Thx
Qubes is what any OS that claims to be "secure" should be like.
I would not be surprised at all if the Qubes model becomes the defacto standard in all operative systems in the future.
@idler: 1) if you trust Tor, then one Tor VM should be enough (you can just use multiple VMs connected to the Tor VM).
2) No, Qubes is a single user system.
Impressive, that is one thing I always missed in an OS - using different networks (interfaces) for different apps (in your case VM's)! QubesOS now should be multi-user aware. But that's kinda wining on a high level. I hope that QubesOS will in near future support Windows as you mentioned in an older post, then it would be my ultimate OS of choice... Okay, since I compose music at least one machine will run MacOS X then.
Good work! I wished I had that idea. ;)
Hi
Thank you for this awesome OS.
I would like to ask if there will be possible to run normal VMs, beside AppVMs in Qubes and install standard operating systems in those VMs. For example If I will need to do some work on Debian, so I will dont need reboot computer (and running other OS on bare metal is not a good thing, beacuse it will not be as secure, as having only Qubes installed). Also it will allow to use simulatenously apps in Qubes AppVMs, and other operating system.
Will such feature be supported by Qubes OS?
Thx for answer.
@johnxyz: support for "normal" VMs is planned after Qubes 1.0, sometime in the first half of 2012.
Is that an error:
echo “1” > /proc/sys/net/ipv4/ip_forward
Wow, just came across Qubes today. I'm going to give it a go tonight. Thanks for sharing your awesome work.
Is there different permissions in qubes 3 for the /rw/config/ directory?
I can't seem to write any of the scripts to it without sudo, but then even when I set them to executable they do not start with the vm.
Post a Comment